Editing photos on your iPhone can transform ordinary snapshots into stunning works of art. With the powerful tools and features built into iOS, you can enhance your images like a professional photographer without needing expensive software or extensive training. Let's explore this topic in more detail with Tiny Fishing below, as we dive into the world of iPhone photo editing and discover how to make your pictures truly stand out.
Before we delve into the advanced techniques, it's essential to grasp the fundamental concepts of photo editing on your iPhone. The Photos app, which comes pre-installed on every iOS device, offers a robust set of editing tools that can dramatically improve your images. These tools are designed to be intuitive and user-friendly, making it easy for anyone to enhance their photos with just a few taps.
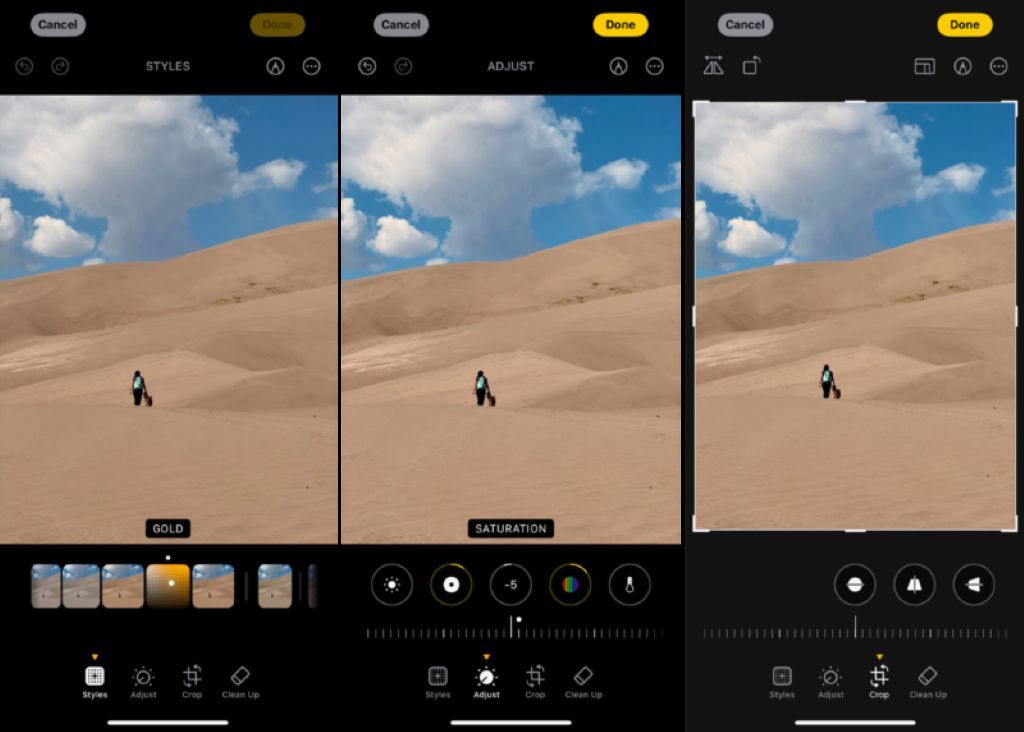
When you open a photo in the editing mode, you'll notice a range of options at the bottom of the screen. These include adjustments for brightness, contrast, saturation, and more. Each of these elements plays a crucial role in the overall look and feel of your image. By understanding how to manipulate these settings, you can begin to craft photos that truly reflect your vision.
One of the most powerful features of the iPhone's editing capabilities is the ability to make non-destructive edits. This means that you can experiment with different adjustments without fear of permanently altering your original image. If you're not satisfied with your edits, you can always revert to the original photo or make further changes. This flexibility allows you to be more creative and adventurous in your editing process.
Read more: How to Take Professional Photos with an iPhone
Once you've become comfortable with the basic editing tools, it's time to explore some more advanced techniques that can take your photos to the next level. These methods will help you create images that are not only visually striking but also convey the mood and atmosphere you want to capture.
Exposure is the foundation of any good photograph, and getting it right can make or break your image. The iPhone's editing tools allow you to fine-tune the exposure of your photos with precision. Start by adjusting the overall brightness of the image, then use the highlights and shadows sliders to bring out details in both the bright and dark areas of your photo.
Contrast is equally important, as it adds depth and dimension to your images. Increasing contrast can make colors pop and give your photo a more dramatic look, while decreasing it can create a softer, more ethereal feel. Experiment with different levels of contrast to find the perfect balance for each image.
Color plays a vital role in the emotional impact of a photograph. The iPhone's editing tools offer several ways to enhance and manipulate the colors in your images. The saturation slider can intensify the overall color of your photo, while the vibrancy option allows you to boost muted colors without affecting skin tones.
For more precise control, use the color balance tool to adjust the warmth or coolness of your image. This can be particularly useful for correcting white balance issues or creating a specific mood. The tint slider can also help you remove unwanted color casts, ensuring that your photos look natural and true to life.
While adjusting individual elements of your photo can yield impressive results, sometimes you want to apply a more comprehensive transformation. This is where filters and effects come into play. The iPhone offers a wide range of built-in filters that can instantly change the look and feel of your images.
Filters are pre-set combinations of adjustments that can dramatically alter the appearance of your photo with a single tap. From classic black and white to vibrant color boosts, these filters can help you achieve a specific aesthetic quickly and easily. However, it's important to use filters judiciously, as overuse can make your photos look artificial or dated.
In addition to filters, the iPhone's editing tools include a variety of effects that can add creative flair to your images. The vignette effect, for example, darkens the edges of your photo, drawing attention to the center and creating a more focused composition. The selective color tool allows you to isolate specific colors while converting the rest of the image to black and white, creating a striking and memorable effect.
For iPhone models equipped with dual or triple-lens cameras, Portrait mode opens up a world of possibilities for creating professional-looking photos. This feature uses depth information to separate the subject from the background, allowing you to create a shallow depth of field effect similar to what you'd achieve with a high-end DSLR camera.
When editing Portrait mode photos, you have access to additional tools that let you refine the depth effect. The Depth Control slider allows you to adjust the level of background blur, giving you precise control over the final look of your image. You can also experiment with different Portrait Lighting effects to add drama and dimension to your portraits.
As you become more proficient with iPhone photo editing, you'll discover that the key to creating truly outstanding images often lies in the details. Fine-tuning your edits can make the difference between a good photo and a great one. This process involves carefully reviewing your adjustments and making subtle tweaks to achieve the perfect balance.
One effective technique for fine-tuning is to step away from your editing session and come back to it with fresh eyes. This can help you spot areas that need further adjustment or identify elements that may be detracting from the overall impact of your image. Don't be afraid to make multiple passes through your editing process, refining your adjustments each time.
Pay close attention to the edges and corners of your photo, as these areas can often benefit from additional refinement. Use the crop and straighten tools to perfect your composition, and consider applying subtle vignetting to draw the viewer's eye towards the center of the image. Remember that sometimes less is more – overprocessing can lead to unnatural-looking results, so strive for a balance that enhances your photo without overwhelming it.
While the iPhone's editing tools are powerful, it's important to be mindful of image quality throughout the editing process. Excessive adjustments, particularly to exposure and color, can lead to degradation of the image, resulting in noise, banding, or loss of detail.
To preserve image quality, start by shooting in the highest resolution possible and using the RAW format if your iPhone supports it. When editing, make your adjustments gradually and pay attention to how they affect the overall quality of the image. If you notice any degradation, try scaling back your edits or exploring alternative techniques to achieve your desired result.
Another important consideration is the output format of your edited photos. When saving your edits, choose the highest quality option available to ensure that your images retain their clarity and detail. If you plan to share your photos on social media or other platforms that may compress images, consider saving a high-quality version for your personal archives as well.
Read more: iPhone Live Photos: What They Are and How to Use Them
Once you've perfected your photo edits, it's time to share your creations with the world. The iPhone offers numerous built-in options for sharing your photos, from social media integration to AirDrop and iCloud sharing. Consider creating albums or collections of your best edited photos to showcase your skills and track your progress over time.
When sharing your edited photos, it's important to consider the platform and audience you're targeting. Different social media platforms may have specific image requirements or compression algorithms that can affect the appearance of your photos. Take the time to understand these factors and adjust your editing and sharing approach accordingly.
Don't be afraid to experiment with different sharing formats, such as creating collages or photo stories that combine multiple edited images. These creative presentations can help your photos stand out in crowded social media feeds and provide additional context for your work.
As you continue to refine your photo editing skills, you may find yourself developing a unique style or aesthetic. This can be a powerful way to make your photos instantly recognizable and build a cohesive body of work. Consider creating custom presets or saving your favorite adjustment combinations to streamline your editing process and maintain consistency across your images.
Remember that developing your style is an ongoing process, and it's okay to evolve and experiment over time. Pay attention to the types of edits and effects that resonate most with you and your audience, and use this feedback to inform your future editing decisions.